Established 1988

Category: Tips and Tricks

Using older Nikon lenses on your modern DSLR

Using older Nikon lenses on your modern DSLR

Last month I was visiting my brother. After a wonderful dinner he disappeared down the basement stairs and returned with an old, dusty camera bag. To my surprise he pulled out an old Nikon F2 film camera and said, “You want this old stuff?” Without a moment’s hesitation I said “Absolutely!”

The camera was in great shape and came with an old Nikkor 50mm lens looking as good as the day it was made! So now I have a vintage Nikon F2 with all the fancy attachments (a work of modern art!) and an old 50mm f-2 lens in excellent condition. This lens was made in 1978 but it works perfectly on my Nikon d750 in Manual Mode. I’ve had a lot of fun using the lens for macro and close-up photography where manual control of aperture and focus are necessary.

 Why use an older lens?

  • These lenses were very well made and inexpensive. They are fun to use and can even improve your photography by forcing you to use your camera’s manual settings.
  • Older Nikkor/Nikon lenses were made of metal rather than plastic and are very rugged.
  • They were optically very good and can often hold their own when compared to modern lenses.
  • Although these lenses lack some of the modern coating to reduce some chromatic aberration, some are optically just as sharp as many modern lenses. Chromatic Aberration can be easily fixed in Lightroom so this issue shouldn’t be a problem.
  • Rather than spend $200 or more on a new 50mm Nikon lens, an older, manual lens can be purchased on the Internet or at a used camera sale for as little as $50. Some of the best old lenses can fetch up to $200 or more but can be used in place of lenses costing over $1000!
  • These lenses are most useful in situations where manual aperture control is needed e.g. Macro photography using manual bellows or extension tubes, reversing the lens for macro.
  • Modern lenses are designed for Autofocus. To improve autofocus speed, focus can often be adjusted from close-up to infinity in as little as half a turn of the lens focus ring. This makes it difficult to get accurate manual focus with modern lenses. Older manual focus lenses have a much larger “focus throw” making it much easier to make fine adjustment to focus where sharpness is critical.

Where to buy these lenses:

  • Used camera stores (HITS Cameras, Burlington Camera for example).
  • On the Internet from eBay. Be careful and buy only from reputable vendors with at least 99% Positive Feedback rating and don’t forget to factor in the exchange rate and shipping costs!
  • Online from You can often negotiate the price and save shipping costs since sellers often live in the local area and you can actually check the lens yourself in person.
  • My favourite place to purchase old lenses is at Used Camera Sales organized by the Photographic Historical Society of Canada. These Photographica Fairs are held a few times a year where you can find dozens of vendors selling all types of old cameras, lenses, tripods, film, and hard-to-find accessories. They also run Auctions twice a year where you can get all kinds of camera gear for bargain prices. Locations and dates of upcoming sales and auctions can be found at their website (http://phsc.ca/ ).
  • Many people buy an old film camera with the lens attached and just get rid of the camera. This is an excellent way to add to your “stable” of lenses without breaking the bank!

Notes on using these lenses with your modern DSLR:

Newer Nikon lenses have CPU contacts that transfer focussing and exposure data to the camera. Older lenses do not have any CPU contacts so they cannot transfer any information to the camera and must be used in Manual Mode.

On older Nikkor/Nikon lenses (non-CPU lenses) made from 1977 onwards, the aperture must be adjusted by turning the aperture ring on the lens and the lens must be focussed manually. Consumer-level Nikon cameras ( D5300, D5200, D5100, D5000, D3300, D3200, D3100, D3000, D80, D70, D60, D40, and D40X) cannot read the metering information from these old lenses. The camera’s light meter will still work but no f-stop values will be displayed by the camera. Higher-end Nikon cameras (D4(S), D3X, D3, D810(A), D800(E), D750, D700, D610, D600 D300S, D300, D200, D7100) can be set to report exposure information from these older lenses and will actually show the f-stop value from the lens. To configure these cameras to use the older manual lens, open the Menu and choose the “SETUP” sub-menu and ”Non-CPU lens setup”. Simply enter the focal length of the lens and the minimum aperture and save.

Early versions of autofocus lenses, first introduced in 1986,  do not have a built-in focus motor so they can only autofocus on Nikon cameras with a focus motor built into the camera. These older lenses without a built-in focus motor will not autofocus on the following cameras: D40, D60, D3000 series, D5000 series.

How to tell if an old lens will work with your DSLR?


In 1977 Nikon introduced a new system for coupling the camera to the lens. This system was called “Automatic maximum aperture indexing” or “Ai” for short. These cameras had a small lever that coupled with the lens to report the f-stop value to the camera.

Lenses using this system will fit on modern Nikon DSLRs and are called “Ai” lenses. They can be used in Manual Mode.


WARNING: Lenses made prior to 1977  (NON-“AI” lenses) cannot be attached to modern DSLRs without possible damage to the camera’s autofocusing and metering system!


How to recognize a Nikon/Nikkor “Ai” lens:


  • “Ai” lenses have a coupling ridge that interacts with the “Ai” lever on the camera. This ridge is cut out of the aperture ring and is raised as shown in the photos below.
  • “Ai” lenses have 2 rows of aperture numbers as shown below.
  • The coupling fork, often referred to as the “rabbit ears”, is not solid but has two small cut-outs.


These lenses will mount to modern Nikon cameras and can be used with manual focus and manual aperture. The camera must be set to M or manual mode.


CHART SHOWING TYPICAL “Ai” LENS

Here’s how to recognize a NON-“Ai” lens:

  • There is no raised, cut-out coupling ridge
  • The aperture ring sticks out past the metal mounting ring. This can damage the AI lever on your camera.
  • There is only one row of aperture (f-stop) numbers).
  • The coupling fork, often referred to as the “rabbit ears”, is solid.

WARNING: These lenses may damage your camera if you try to use them!

Nikon provides some excellent resources focussing on older lens compatibility with new cameras.

Before you try an old lens, check out these web sites!


  1. A Nikon web site that lists different lens types and compatible cameras. http://imaging.nikon.com/lineup/dslr/d3000/compatibility.htm


  1. An excellent article: “Can I use my lens from my old camera on a new digital SLR? “

https://support.nikonusa.com/app/answers/detail/a_id/14439/~/can-i-use-my-lens-from-my-old-camera-on-a-new-digital-slr%3F


  1. An excellent summary: “What is the difference between an AI lens, an AI-S lens, and Non-AI lens?”

https://support.nikonusa.com/app/answers/detail/a_id/5366/session/L2F2LzEvdGltZS8xNDUzNjgzOTUyL3NpZC90MjRaUm1IbQ%3D%3D


  1. The following web site lists Nikon lenses, their version numbers, serial numbers, the year they were made and, most importantly, the lens type (AI or NON-AI)

By clicking on the lens number you can also see a photo of the lens… An Excellent resource!

http://www.photosynthesis.co.nz/nikon/serialno.html


In conclusion, don’t be afraid to try older Nikon “Ai” lenses on your camera. These lenses are most useful in situations where manual focus and manual aperture are preferred:

Night Photography, Macro photography. (These lenses can also be reversed to give even more magnification!), High-speed photography, Video, Portraits and Still-life. They are often of high quality, were built to last a lifetime or two and will give you hours of enjoyment. You may also find that its lots of fun browsing the vendors in the Photographica Fair or bidding on used gear at the auction.

Older lenses are much less expensive and will allow you to try out prime and zoom lenses of different focal length before you decide to purchase a new one. By working in manual mode you will learn more about how your camera works and how to take control of aperture, shutter speed and ISO. You will be forced to slow down and really take the time to create the photograph that you want!


Give your computer a performance boost

Give your computer a performance boost

Let us imagine that it has been a year or two since you brought home that new shiny computer; too early to consider a replacement, but a good time to consider a mid-cycle refresh – to improve performance and take you through the next couple of years.

Below are a few ideas.

Operating System/Software

Before you start spending your money on hardware, there are some software things you can look at:
• Disable or remove unwanted startup programs
• Remove abandoned software/Clean up unnecessary system files
• Keep your system free of viruses and malware
• Upgrade to a newer operating system
• Check for newer device drivers

Please be careful, make sure you have a proper backup before starting, and if you are unsure as to what you are doing, get knowledgeable assistance.

Hardware

As you probably know, there are many sub-systems that make up a computer. Some of them are limited by the manufacturer=s system design, but others can be easily enhanced without considerable expense. There are three subsystems that can be upgraded to substantially improve a machines performance – memory (RAM), storage and video.

Please note that there are design limitations and not all computers can be upgraded. Notebooks are generally more difficult to upgrade than desktop/tower machines. This article is intended to be of general information and not necessarily applicable to every configuration. Also note, that right or wrong, the author has a Windows perspective on the world, but much of this will apply to a Macintosh environment.

Memory

More is better. Up to a point. If you have 4GB of RAM, upgrading to more will help. Eight is better than four, and sixteen is better than eight. After that there is the law of diminishing returns, although for power users even more may be beneficial. If you are a power user, you already know this stuff. (Note: You need to be running a 64-bit operating system to take advantage of more than 4GB of RAM.)

You may find that your computer is limited as to how many memory slots are available and the maximum amount it will recognize. Check your manufacturers website or try www.kingston.com as a good third party source for both information and memory. Choosing the right memory can be a bit of a minefield, so you may want to engage professional assistance.

Storage

For the past thirty years we have relied primarily on spinning-media hard drives. The industry is changing. Spinning drives still give you the most storage for the least cost, but Solid State Drives (SSDs) are making significant advances in performance and lowering the cost/GB.

If you have a spinning hard drive, there is a good chance that you can replace it with an SSD. You will be amazed at how much faster everything happens on your computer. Startup times are typically reduced from many minutes to generally under a minute. Upgrading to an SSD gives you the best Abang for the buck@.

The majority of SSDs are available in 2.5″ form factors and have SATA interfaces, which is the usual interface for most notebook and desktop type computers. For the most part, you can unplug the old drive and plug in the new SSD in its place. Be sure you have all the right cables, both data and power. If your old drive is a 3.5” device, you may need a new way to secure it in your computer.
Just like spinning drives, not all solid state drives are the same. A good guide line would be to pay attention to the length of the warranty, and buy a brand name with which you are familiar.

Be aware that a newer solid state storage interface standard exists, it is called NVM Express for PCIe. Higher end notebooks are starting to take advantage of this improved performance, and if you are upgrading a desktop/tower machine, this may be an option for you as well. (http://www.nvmexpress.org/)

What is behind this newer standard? Having a SATA interface means you can plug an SSD in where you once had a spinning hard drive, which is very convenient. However, the speed that data moves through the non-volatile memory (NVM) used in SSDs is so much faster than it can move through a spinning hard drive. This results in a bottleneck at the SATA interface, as it was designed for the slower requirements of spinning drives. NVM Express PCIe removes this bottleneck, but as you might have guessed, at a higher price. These drives look less like the old hard drives and more like memory modules or PCIe plug in cards. Major players are Samsung and Intel.

An NVMe drive is the ultimate storage upgrade, but pricey. It might be something to consider for the next computer.

Video

In April of this year, with the release of Lightroom 6, Adobe made a number of improvements. One of them was to recognize and incorporate GPU acceleration for faster video performance. Okay, before I lose you, GPU stands for Graphics Processor Unit, or in other words what we old-timers used to call a video card.

If you already have a good graphics subsystem, Lightroom may have already recognized it and taken advantage of it. There are methods to check this within Lightroom and your favourite search engine will direct you to them. A good place to start is at:
https://helpx.adobe.com/lightroom/kb/lightroom-gpu-faq.html

Will a better GPU improve your performance? In doing my research I came across this thread from an Adobe engineer. It seems the answer is maybe; it depends on your circumstances. See more here: https://forums.adobe.com/thread/1828580

For Photoshop, Adobe says the minimum amount of graphics processor VRAM supported is 512 MB (1 GB or greater of VRAM is recommended).

I found some helpful information at:
https://helpx.adobe.com/photoshop/kb/photoshop-cc-gpu-card-faq.html
and
http://www.nvidia.ca/content/adobe/pdf/adobe-hardware-performance-white-paper.pdf
Be careful as you cannot buy just any card and plug it in, you need to know, or get someone to help you determine, what sort of expansion slots your computer has available, and select the appropriate display adapter. Your computer manufacturer may have some suggestions

I hope and trust this will make your computer and your photo processing experience more enjoyable.

John Allman
President, Toronto Digital Photography Club
 

Acknowledgements:

My thanks to Danny Andonoff of Plexxus Technologies Inc. and Roger Correia of the Toronto Digital Photography Club for proof reading this article and for their comments and suggestions.


Sports Photography

Sports Photography

with Angela McMullen

Don’t Worry About the Noise

Shooting amateur sports often means shooting in less than optimal conditions, especially at indoor venues. To compensate for lowlight, photographers must raise the ISO on their cameras to capture the action, and this results in noisy images or images with a lot of grain. However, a noisy sports image is not necessarily a bad image (and in fact, noise sometimes gives an action shot more punch and grittiness), and you should think hard before using that noise reduction slider in Lightroom or Photoshop Camera Raw.

Why?

Reducing the noise in an image also reduces its clarity by

blurring. Try it yourself. When processing a RAW image taken with a high ISO (2500 or greater), magnify the image 200-percent and then reduce the noise using the Noise Reduction slider. See thedifference? Your image has less noise but also less detail.


So, when processing your sports and action shots, ask yourself

which you would rather have: a great action shot with a little noise

or a blurred image with little detail? And remember, I’m talking

about noise here not focus. Still not convinced? Look at this image I shot at a Whitby Wolves’ hockey game. It’s noisy, but is still a good action shot.


Photography by Angela McMullen


It’s Cloudy…..But Is It Cloudy Enough?

It’s Cloudy…..But Is It Cloudy Enough?Leif

Leif Petersen has been a member of the Oshawa Camera Club since moving to Oshawa, from London, in 2008.  He has served on the club’s Executive Committee as Community Liaison, Vice President, President and is currently the Past President.  Leif is a member of Durham College’s Digital Photography and Video Advisory Committee and the Treasurer of the GTCCC.  He often leads workshops on various photography subjects and provides printing, matting and framing services for OCC and other club members

How to Get More Life and Mood Into Dull Clouds

I’d venture to guess that, after returning from a shoot on one of those days when, although there are clouds, they aren’t quite as dramatic as you’d like them.  In fact, when you start going through your shots, the sky is just marginally better than bald.  Of course, you can bring Lightroom’s ‘Highlights’ slider down to the left to try to recover some detail, but it doesn’t work really well if there’s very little detail there to start with.  Have you ever heard of the ‘Cloud’ filter in Photoshop?

I’ve chosen a shot I captured in front of Halgrimskjirka, the Lutheran cathedral, and the statue of my namesake, Leif Eriksson, in Reykjavik, Iceland to demonstrate this tip/trick.  I used the ‘Highlights’ slider to bring back some cloud detail, but it didn’t do much for it.

Clouds - 1


Here’s the process:

  • Open the image in Photoshop
  • Shrink it down: press the letter Z and then hold the Alt/Option key & click
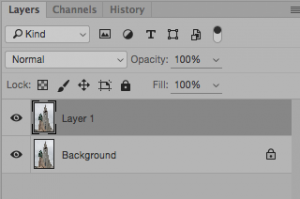
  • Create a duplicate layer: Ctl/Cmd-J 

          Duplicate Layer


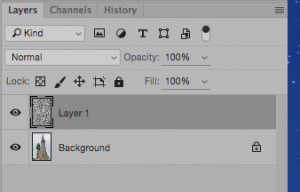
  • In the Menu bar, go to Filter>Render>Clouds, which puts an ugly mask over your image and ‘Layer 1’ becomes the clouds

Cloud Layer


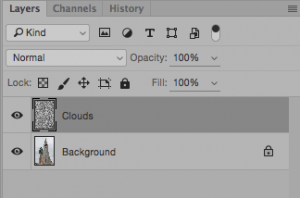
  • Double click on ‘Layer 1’ and rename it ‘Clouds’

Cloud Layer 2

  • Stretch the ‘Clouds’ layer out: Ctl/Cmd-T, grab the handles and stretch the clouds out; you can also rotate it a bit if you like, then press Enter
  • In the Menu bar, go to Image>Calculations and make the following settings:
    • Merged > Gray
    • Blending > Screen
    • Result > Selection

Clouds Selection

  • Press Ctl/Cmd-D to unselect
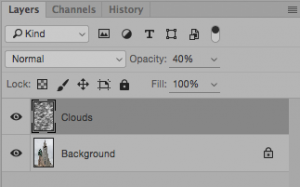
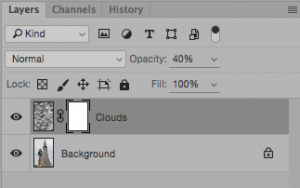
  • Reduce the Opacity of the ‘Clouds’ layer to about 40% so that you can see what’s going on

Cloud Layer 3 Opacity

  •  Press the letter V and move the clouds around to the desired location
  • Apply a mask to the ‘Clouds’ layer

Cloud Layer 4 Mask'

  • Make sure that the Mask is selected by clicking on it and then brush the clouds out of the areas you don’t want them
    1. Before brushing clouds out, you can stretch them out more, move them around or rotate them more by pressing Ctl/Cdm-T
    2. Do the work you want them press Enter to lock it in
    3. Note that if you make those adjustments after you brush the clouds out, you’ll see the areas where they’ve been removed
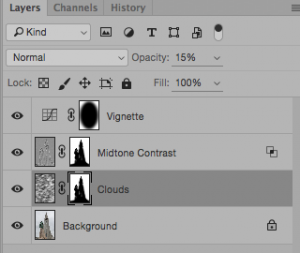
  • Adjust the opacity to the desired level, likely in the 15% to 20% range
  • I’ve also added some Midtone Contrast & a Vignette
    • You’ll see that I added the mask to the Midtone Contrast layer. You add the mask to another layer by clicking on the mask in the ‘Clouds’ layer, holding down the Alt key and dragging the mask to another layer.

          Final Layers Panel


And here’s the final image


Clouds - 2


There’s Another Option, You Ask?  Certainly, This is Photoshop!


As with many things in Photoshop, there’s more than one way to do it.  In this case, Option 2 is:

  • Create a selection of the sky using the Quick Selection tool
  • Save the selection: Select > Save Selection and then press Ctl/Cmd-D to unselect
  • After moving the clouds to the desired location, load the selection: Select > Load Selection
  • Add a mask to apply the clouds to the sky only
  • Adjust the opacity to suit your taste

The disadvantage of this method is that you can’t move the clouds around after.  Try it to see what I mean.

Now it’s time to go back through your photos looking for dull, cloudy days that you can add some life to.  Have fun!


Planning for your next Photo Vacation

Kevin White has been a member of the Mississauga Camera Club since 2006 and is currently the Team Lead for workshops.KevinWhite

Planning for your next Photo-Vacation.

In this article I’m going to provide a quick checklist of things to think about when you are planning for your next trip.

Research, research, research!

First of all, research your destination(s) from a photography perspective.  Use the web to check the expected weather, openings and closings of events and attractions, upcoming festivals and photographer guides to your destination.   Determine what the golden hours are for the destination.  Does the seaside face west or east for sunsets and sunrises?  What is the timing for the tides if you are shooting an ocean view?

Don’t forget to check local customs – who or what are you allowed to take pictures of and when?  Is paying for pictures customary?   Are permits are required for commercial photography (such as in Banff, Alberta or Uluru, Australia).

Think about what types of shots you may wish to take (or avoid taking!) by performing searches using Flickr, Google Images, etc. to see what other photographers have already captured for your destination.   Don’t feel that you have to repeat what others are taking, but these shots may inspire you and suggest things to see/do while you’re visiting a new locale.

If you’re thinking of taking pictures for stock photography, check for professional travel photographer shots of location(s), (eg. Shutterstock.com, Corbis.com, Dreamstime.com, iStockphoto.com).  Make sure you are aware of known image restrictions for places and landmarks (eg. “The Gherkin” building, and royal residences {Buckingham Palace, Windsor Castle} and National Trust properties in England, CN Tower in Toronto, Eiffel Tower in Paris and many landmark properties in the U.S.)

Once you’ve done your research, prepare your itinerary by creating a shooting list which includes a list of attractions, events, locations (including times of day) that help you organize your trip.

Keep researching when you arrive at your destination (for example, get brochures, talk to locals, etc.).  Take a tourist bus around the local on the first day to see what you`d like to explore in more detail later.

What to take?

  • Camera Bodies:

Some photographers swear by having a primary camera body and a backup body.  Personally, I prefer to travel light and keep to a single camera body and use my cell phone camera as the backup.  It all depends if you’re shooting commercially or for pleasure.


  • Power:

Don’t forget to bring extra batteries and your charger.  If you’re going overseas, find out what AC power plugs/sockets are in use and if you need an adaptor.  My wife and I buy a single AC adaptor and a power bar and plug all our rechargeable appliances (cell phone, camera batteries, my shaver, etc.) into the power bar.


  • Memory Cards:

Think about how many pictures you expect to take and translate that into the number of memory cards you’ll need to bring.   How many pictures did you take on your last vacation?


As an example, a 32 GB memory card for my Nikon 7100 holds about 596 24MP RAW images.  For some people that’s only a day’s worth of shooting!  Are you planning to shoot video as well?   The same 32 GB card holds only 4 minutes of HD1880p (5 Mbps) video.


A good idea is to spread your images over a number of cards and not to put all your images on a single card, in case it’s lost or damaged.


What about disk backup?  If you’re on a long vacation you may want to backup your files to an external disk drive.  Bob Fowler posted a good article back in January on backing up photos while on vacation see http://gtccc.ca/backup-images-while-travelling/.


  • Lenses:

If you’re bringing a DSLR then you have to decide which interchangeable lenses you’ll need.

Lenses present a trade-off between weight and the quality of the shots you’ll get.  After you’ve done your trip planning and created your shooting list, then you can decide on the lenses you need to bring.


For convenience there is the “travel lens” approach – one lens for everything.  These are normally the 18-300 mm (DX) or 18-200 (DX) lenses which do not provide the sharpest quality at any one focal length, but are very convenient to use since you don’t have to change the lens, you have less to carry and you’re always ready for the shot.


On the other hand, for the best quality photos you may wish to take a variety of specialized lenses.  For example, 10 – 28mm for landscapes, 50 – 100mm for portraits and 200 – 500mm lenses for animal safaris.  The tradeoff for better quality photos is the bulk and weight of additional lenses and the need to change lenses to suit the subject matter.


  • Tripod:

Do you need to take a tripod?   Look at your itinerary – are you going to be walking a lot, taking public transit or driving?  If the first two, then you may find the tripod a nuisance.  When flying, a tripod cannot be brought onboard as carry-on luggage, but will have to be checked luggage.


Review your shooting list.  Are you taking a lot of night shots or other pictures where stabilization is required?  If so then you can also look at some compromise solutions such as a “table top” tripod (I keep the Manfrotto 709 in my bag) or “the pod” beanbag from http://www.thepod.ca/.  Note that even table top tripods will not pass through the airport security checks and have to be treated as checked baggage (I also had to check mine for the NY Empire State building observation deck).   Another hint for museum photographers is that while most museums have banned tripods, many will allow you to use a monopod!  This will help you stabilize your shot and reduce your ISO and shutter speed.


  • ND, Polarizer or graduated filters?

Do you intend to take pictures of moving water (tides or waterfalls) for which you’ll need an ND filter, or sunrises and sunsets and aren’t going to use Lightroom/Photoshop to correct via graduated filter?   If you plan on taking multiple lenses, then you can save on the number of filters by just getting ND or graduated filters for your landscape lens, since that is the lens you’ll probably use for these types of shots.


  • Shoulder bag or Knapsack?

A shoulder bag provides easier access to your camera in a hurry, but can be a pain in the neck if you’re carrying it around constantly for 2 hours or more.  On the other hand a knapsack is better ergonomically and often has room for jacket, maps, souvenirs, but is usually slower for you to get camera out and is less secure than a shoulder bag.  The speed with which you can get your camera into action (and back in the bag) and be important not only for you to get the shot as it is unfolding – but also helps you if your spouse or significant other is not a photographer and is losing patience with frequent requests for “just one more shot honey”!   Personally I switched from a knapsack to a shoulder bag that holds a DX body and two additional lenses.


By the way, don’t get a camera bag with your camera brand on it.  You might as well stick a label on it that says “Steal Me”.


A good idea is to also bring Ziplock baggies for rainy days / wet weather, as well as a waterproof cover for your camera, lens(es) and camera bag if you plan on visiting a rainy environment.


Lastly:

It’s wise to practice every shooting situation before you leave.  You should know every button and feature on your camera – if you don’t, bring your camera manual with you.  The time to find out that you accidentally changed a setting and can’t remember how to reset it is at home, not when you’re 2,000 km away from your manual.


Oh yeah, don’t forget your clothes, passport, etc.


Have a great vacation!